
Custom Windows Installation#
Instead of the installer you can also get your own servlet container, set up your own database, and install the actual Allegra application in it.
This section describes this procedure for an installation with Apache Tomcat and an already existing MS SQL Server. For other database systems, the procedure is almost identical.
Preparation#
Permissions#
You must have the following permissions on your server:
You must be allowed to install software.
You must have permission to install services.
You must have permission to create a database.
Hardware and Software#
First, you need to make sure that the installation environment meets all necessary requirements:
You must be logged in with administrator privileges.
Check that the hard disk on which programs are normally installed (usually
C:\Programs) has at least 800 MByte of free space.Install Java on the computer if you don’t already have it there. You have to use Java 11. You can download it from the AdoptOpenJDK server.
There should not run any other software that provides services on port 80 or port 8080, like IIS or any other web server on the same machine. There should be no other Tomcat running on the server either.
Create an empty database with the correct character encoding. The database server can be the same as the Allegra server, or you can run it on a separate machine. On a Windows server, it’s recommended to use an MS SQL Server database, or if you want to use XAMPP, the MySQL database included with it.
Follow the instructions for database installation.
You must grant a database user the permissions to create tables and indexes. This user will be used by Allegra to connect to the database.
Setting up Tomcat#
In this example, we use Apache Tomcat as a servlet container. In a production environment, this container should either run behind a proxy server such as nginx, Apache, or IIS, or be configured to allow itself to allow only SSL secured connections.
Downloading Tomcat#
You can download the Apache Tomcat servlet container for free here. We recommend the 32/64 bit Windows Service Installer, which sets up Tomcat as a service. If you are using XAMPP, you can use the Tomcat server included in the package and skip this and the next step.
Installing Tomcat#
Just run the installer. Select a
port where Tomcat will listen, e.g. 8080 or 7080.
Under this port you will reach Allegra later.
We name the installation directory of Tomcat
$TOMCAT_HOME. Via a small icon at the bottom right
on the desktop you can manage the service.
Configuring Tomcat#
Open the Tomcat service manager at the bottom right of the desktop or from the Windows Service Manager and stop the service.
Choose a directory where you want to keep the Allegra configuration files as well as
all attachments and index files for the full-text search.
You should provide enough disc space
depending on the number of users and the number of attachments,
about 1 to 10 GByte. This directory is also referred to as $ALLEGRA_HOME.
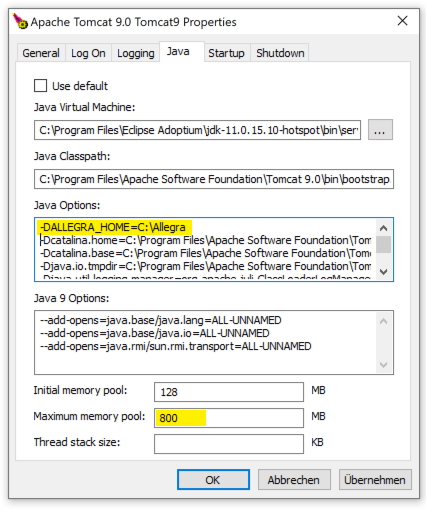
Now enter the following data in the Tomcat service manager:
-DALLEGRA_HOME=path\to\$ALLEGRA_HOME
and change the memory provided to at least 800 MByte. For large installations, you must increase the value into the GByte range.
Hint
Allegra comes with JDBC drivers for MySQL, MariaDB, MS SQLServer
and Postgres. If you want to work with another database system such as Oracle or DB2
you will need to add the appropriate drivers to the Apache Tomcat
directory under C:\Program Files\Apache Software Foundation\Tomcat9\lib.
Setting up Allegra#
Downloading Allegra WAR File#
You can download the Allegra WAR file for free from the Allegra download page.
Install Allegra WAR File#
Stop the Tomcat service using the Tomcat service manager at the bottom right
of the desktop.
Copy or move the Allegra WAR file to the directory
$TOMCAT_HOME\webapps.
Rename the file to allegra.war.
Configuring Database Connection#
Configure the database connection in the file
$ALLEGRA_HOME\Torque.properties.
Start the Tomcat service with the Tomcat service manager on the bottom right of the desktop again and wait a minute or two.
Then, using your browser, visit the URI
http://localhost:8080/allegra. If you had configured
another port, you have to use it instead of 8080.
You can find the log files under $TOMCAT_HOME\logs and under
$ALLEGRA_HOME\logs. Check them for any error messages.
Optional Components#
You can now add optional components.
Printing Gantt-Diagrams#
To create nice PDF Gantt charts you need to configure and possibly install a print server. More information about this can be found at Gantt Chart Print Server.
If you are having problems printing large Gantt charts (500+ elements over a longer period of time), you may need to set some timeouts in your web server or servlet container. For an Apache web server, you can add or change the following in your server configuration file:
...
<IfModule mod_reqtimeout.c>
    RequestReadTimeout head=20-30,body=30,MinRate=1000
</IfModule>
...
For a Tomcat server, you would need to adjust timeout and upload size parameters in the file
...tomcat9\conf\server.xml:
...
<Connector port="80" protocol="HTTP/1.1"
           connectionTimeout="30000" asyncTimeout="20000" maxPostSize="40000000"
...
<Connector port="8009" protocol="AJP/1.3" redirectPort="8443"
        asyncTimeout="20000" maxPostSize="40000000"/>
...
Basic configuration#
You should now see login instructions in one browser window and the login screen in a second window.
Follow the instructions on the hints screen or go to the instructions for the basic configuration.
Security#
If you want to run the Allegra server productively, you should put it behind an nginx, Apache or IIS proxy server. This way you can ensure that only SSL-secured connections are used and you do not expose the Tomcat to the Internet.
Instructions on how to do this can be found here, for example: