Filters#
You can define as many filters as you want and reuse them for selecting a set of items. You can change and publish these filters at any time so that others can use them. You can create parameterized filters that predefine most conditions and ask for one or more parameters when they are used. You can associate a view type like “Gantt” or “Task-Board” with a filter.
Filter Repositories#
Filters are managed in repositories. There are three at the top level:
Private Repository
Workspace-specific Repository
Public Repository
Every user has their own private repository where they can manage their own filters.
Workspace managers can manage filters in workspace-specific repositories, e.g. to provide their project team members with helpful filters for their project. These filters appear in the navigator tree as sub-nodes to the workspaces.
System managers and system administrators can deposit generally accessible filters available to all users in the public repository.
Defining Filters#
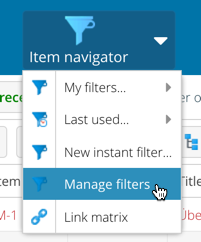
Select in the menu Item overview > Manage filters.
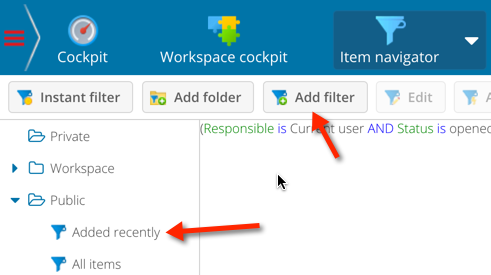
First, select a folder in the toolbar area, then click on “Add filter”.
In the window that appears, define your filter.
Give this filter a suitable name.
Check the “Subscribe” checkbox (A) if you want to add this filter to your item overview.
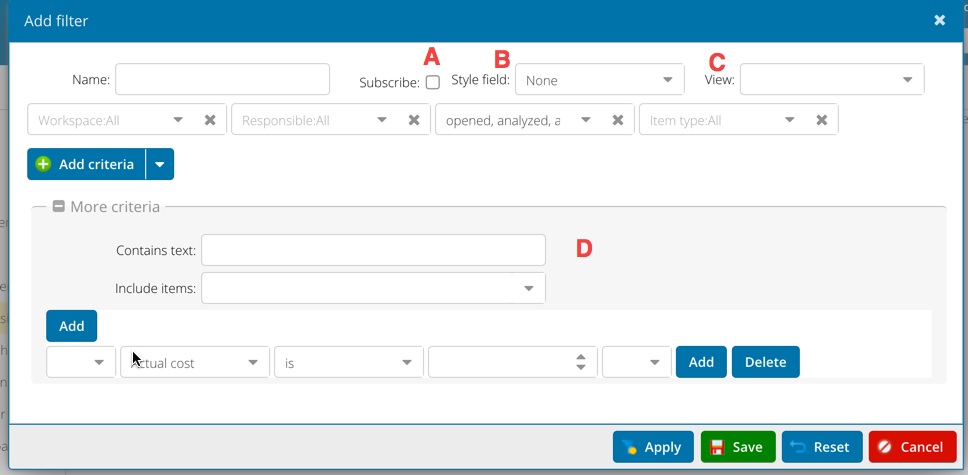
You can select a style (B) that determines the background and foreground colors in the table-based views and the left color bar in the task board, which is based on the field value.
With this filter, you can link a view type. Together with the saved layout, you can predefine a complete view with column layout, grouping, sorting, etc.
In the lower part of this configurator, you can define more complex criteria. Which attributes appear here is determined by a property of the attribute.
Save the filter.
Deleting Filters#
You can delete filters if you are their owner or have system administrator or system manager rights.
Select in the menu Item overview > Manage filters.

Select a filter by first opening a folder and then clicking on the desired filter in the right list area.
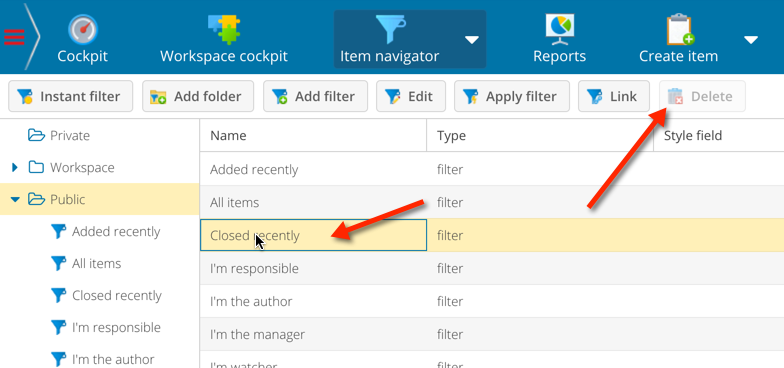
Click in the toolbar area on the “Delete” button, or use the context menu, to delete the selected filter.
Creating a Permanent Link#
This section explains how to create permanent links to item lists. This allows you to publish HTML links that execute a filter under your account.
Sometimes you might want to give other people access to the result of a certain query, even if these people do not have an account with your Allegra. Such access is also useful when you use the Maven build system to integrate item descriptions from Allegra into project reports generated by Maven.
Allegra allows you to create permanent links that execute a query under your account and return the result either as an XML file or as a normal item overview in the navigator.
You can choose parameterized queries, and you can choose whether the user should remain logged in after executing the query. This can be useful if you use the guest user for access and give users the opportunity to sort and group the data in the item overview.
Select in the menu Item overview > Manage filters.

From the list of available filters, select the filter for which you want to create a permanent link.
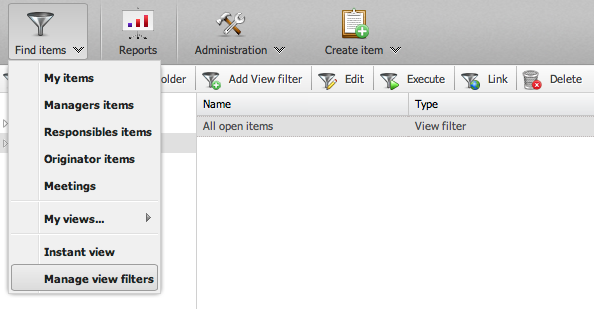
Click on the link symbol in the toolbar area.
Choose whether you want to create an Item Navigator link.
If you have a parameterized filter, choose whether you want to add parameters to the query. If you do not check this, the user will be asked for the parameters every time they click on the link.
Choose whether the user should remain logged in after executing the query.
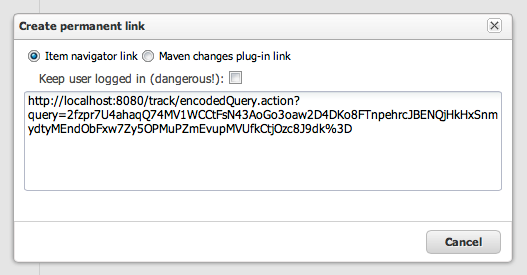
Warning
This allows sorting and grouping, but also allows the user to access the system under your name. Therefore, this option should only be chosen for the guest user or another user with carefully controlled access restrictions.
Copy the link for further use.
Creating a Link for Maven#
Maven is a widely used project management system that can automatically generate project documentation. Maven can include information from other systems and build or release them on Maven.
To get information from Allegra In Maven, you need the Allegra Maven changes the plug-in and installs it in your Maven installation. Then you can create a Maven link and copy it to the right place in your Maven pom file.
The two main tags that you need to change are the mapping of item types to Maven action types and
the query URL.
<Build> <plugins> <plugin> <groupId> org.apache.maven.plugins </ groupId> <artifactId>
maven-compiler-plugin </ artifactId> <configuration> <source> 1.5 </ source> <target> 1.5 </ Target> </
configuration> </ plugin> <plugin> <groupId> com.trackplus.mvn.plugin </ groupId> <artifactId>
trackplusChanges </ artifactId> <version> 1.0-SNAPSHOT </ version> <configuration> <Query> http: // gandalf:
8080 / track / xml / report? Query = nKsW4DXl5WsX ...% 3D </ query> <! - Standard action type -> <defaultType>
fix </ defaultType> <! - - Mapping between Allegra item type -> <! - and Maven action type ->
<issueTypesMap> <Task> fix </ Task> <ProblemReport> fix </ ProblemReport> <Requirement> add </ Requirements>
</ issueTypesMap> </ configuration > <Execances> <execution> <phase> compile </ phase> <Goals> <Goal>
Generate changes </ Goal> </ Goals> </ execution> </ executions> </ plugin> </ plugins> </ Build>
Select in the menu Item overview > Manage filters.

From the list of available filters, select the filter for which you want to create a permanent link.

Click on the link symbol in the toolbar area.
Choose whether you want to create a Maven link.
If you have a parameterized filter, choose whether you want to add parameters to the query. Anything else makes no sense for a Maven link.
Choose that the user should not be logged in after executing the query. Anything else makes no sense for a Maven link.

Copy the link where you have used it.
