

Locales and Terminology#
You can change virtually any term in Allegra and also add new languages. Allegra adapts to your terminology; you do not have to adopt Allegra’s terms.
To change or translate terms in Allegra, go to Administration > Customize > Locale Editor.
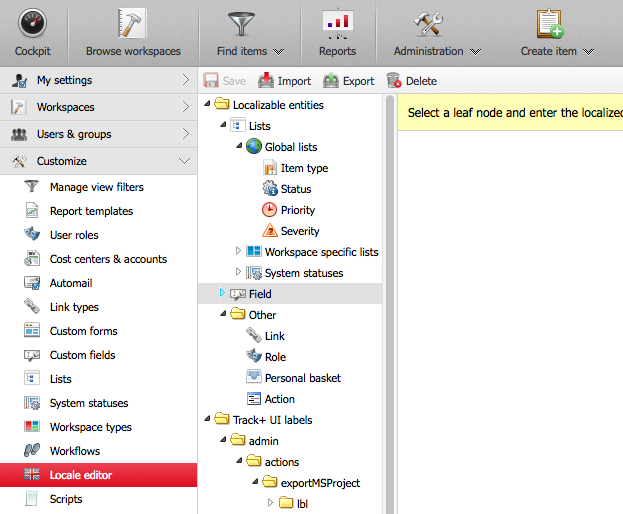
To customize an item, select it in the tree structure (second column from the left). In the right workspace, you will get a window as shown in the figure below.
In the left column in the right workspace, you see the identifier of the item to be localized. If there is no default localization and no localized text for the item, the ID is displayed.
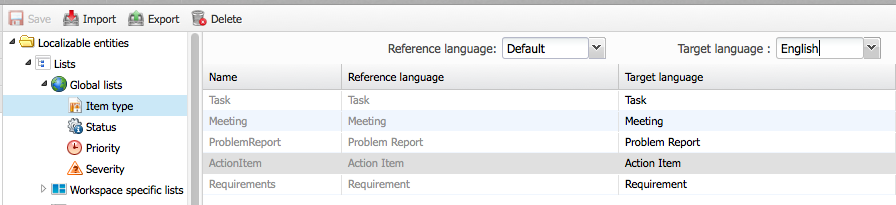
In the second column in the right workspace at the top, you can choose the original language. For example, if you are familiar with English and need to translate to Italian, you would choose English and Italian in the left column.
The “default” language is English and is used if there is no more specific localization for the desired locale.
You can only edit the target language in the left column. After making your changes, save them.
The localization setup is very powerful. You can name a property in a project or workspace “A” and in another “B”. For example, you can talk about “products” in one context and “projects” in another for the same items.
The localization is stored in the database and is retained even when you update Allegra.
Importing and Exporting Resources#
You can export an entire set of localized resources from Allegra into a Java properties file. You can also import a set of resources from a Java properties file. When importing, select the file from which the resources should be read. Choose the language for which this resource file is intended. Choose whether you want to overwrite resources with the same identifier that you previously edited directly in Allegra. If not, such resources will be retained, and the values from the resource file will be ignored.
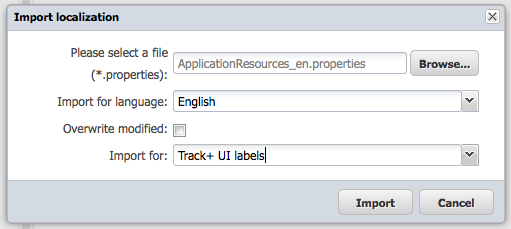
Finally, choose whether the import file is intended for standard user interface texts or for system lists, custom attributes, etc. After making your selection, click “Import” to import the resources into your Allegra system.
Automatically Loading Resources#
Instead of manually updating all required resources, you can place them in specific files and locations on the hard drive. If Allegra finds resource files there during system start, it will load them into the database. You need to provide the following structure:
ALLEGRA_HOME/resources/MyApplicationResources.properties
ALLEGRA_HOME/resources/MyApplicationResources_en.properties
ALLEGRA_HOME/resources/MyApplicationResources_de.properties
and so on for other languages. The system lists, attributes, item types, etc., must be placed in the following files:
ALLEGRA_HOME/resources/MyBoxResources.properties
ALLEGRA_HOME/resources/MyBoxResources_en.properties
ALLEGRA_HOME/resources/MyBoxResources_de.properties
and so on for other languages.