

Managing your user profile#
owner sysman sysadmin
You manage your personal settings freely: password, user name, profile picture, email notifications, and system role.
To do so, click your profile picture in the top right corner.
Enabling LDAP#
You manage your credentials on an LDAP-compatible directory server. This way, you use your Windows or Unix password directly to sign in to Allegra.
Two-factor authentication#
Two-factor authentication is optional or mandated by your administrator. As the second factor, you use either your email address or a common app such as Microsoft Authenticator or Google Authenticator.
Setting the color scheme#
You choose between a light and a dark presentation of the interface — or take the setting from your desktop system.
Download behavior#
Normally, the browser decides whether downloads are displayed directly or offered for saving. Here you specify that downloads are always saved automatically.
Setting the CSV separator#
Allegra exports reports in Excel format. Depending on the language setting of your Office installation, different separators are used (usually a comma or a semicolon). Here you adapt the separator to your installation.
Query layout management#
If this option is active, Allegra saves your individual arrangement for each filter — the selected columns, sorting, and grouping in the item overview. This is usually the desired behavior.
If the option is disabled, Allegra always uses the default layout.
Setting the system role#
Every user has a system role. It determines the available permissions (e.g. administrator or normal user) and which menu elements are visible. With this, you simplify the interface in a targeted way when users do not need all functions.
As an administrator, you set, for each user, the highest system role they may select themselves.
Configuring email reminders#
Allegra reminds you by email of upcoming or overdue items. You determine on which weekdays you receive notifications and with how much lead time.
Example: An item is due on Tuesday, April 24. In your profile, you have set that reminders are sent only on Mondays. With a lead time of ten days, you receive the reminder on Monday, April 16 — eight days before the due date.
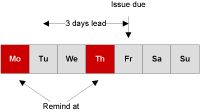
The following figure shows another example: an item is due on Friday. Allegra sends reminders only on Mondays and Thursdays. With a lead time of three days, you receive the reminder on Thursday.
Activating a deputy#
You name a deputy who acts in your absence. The deputy receives all your rights and roles — both global and RACI roles.
If you are, for example, the manager of an item, your deputy sees and edits it with the same rights. All actions of your deputy, however, remain identifiable under their name and are not attributed to you.
Defining a user style#
In many places in the system, you configure a “style” for the presentation of item attributes — consisting of background and font color as well as text decoration (bold, underlined, etc.).
Each user can assign themselves a personal style. In the item browser, cells containing this user (for example, as the responsible) then appear in the corresponding color — provided styles are enabled for the column.
Managing availability#
Enter your absence days here — for example, for vacation, illness, or business trips.
Your availability is based on a base calendar that contains general days off (weekends, public holidays). In your personal calendar, you enter only absences that deviate from this.
Generating iCalendar URLs#
You connect Allegra to your desktop calendar application. This way, you see all the start and due dates of your items in your calendar application (e.g. Thunderbird, Outlook, or Lotus Notes).
Here is how you transfer your items into the desktop calendar:
Select the desired projects.
Click “Generate iCalendar URL”.
Copy the URL that is displayed.
Paste the URL into your calendar application.
After that, you see all the start and due dates of your items in the calendar.